
Will bearded dragon eggs hatch without an incubator? Yes, the eggs will hatch even in the absence of an incubator, but you need to care for them properly.
To breed and take care of your dragon’s eggs can be overwhelming, though, if you have the right knowledge, types of equipment, and preparation, it is easy to accomplish the task.
You require to understand the process of hatching and caring for the bearded dragon eggs. Keep reading for more details on hatching bearded dragon eggs without an incubator and more.
Contents
Bearded Dragon Eggs
Bearded dragons are quickly becoming popular as pets. These adorable creatures have suddenly risen from anonymity, and more and more reptile lovers know about them.
Bearded dragons are calm, affectionate, friendly, fun, making them preferable by reptile enthusiasts.
Moreover, the beardies can rapidly reproduce and thrive well in captivity. As long as you have the right combination of male and female, you will be raising abundant hatchlings at the end of every reproductive cycle. It is a profitable investment, particularly to the breeders.
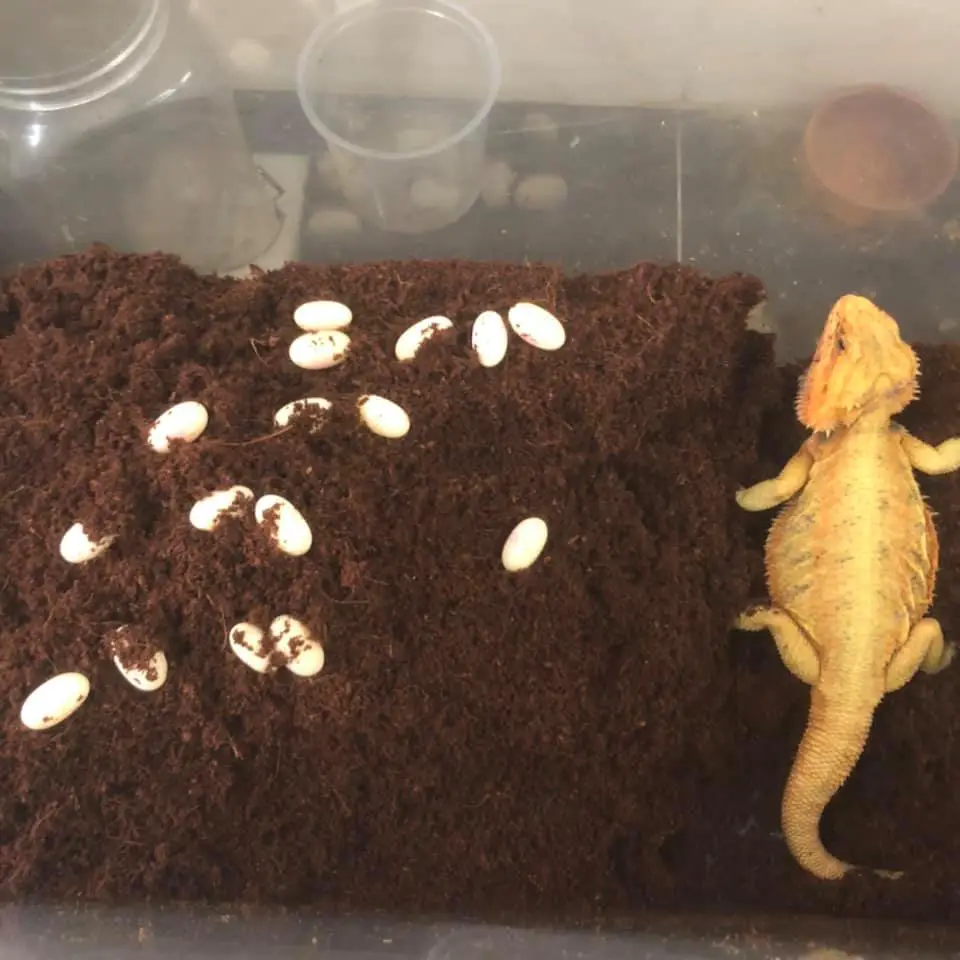
Having a female beardie in the terrarium, you will always discover its eggs, and the more females you own, the more chances of getting the eggs.
Even if you don’t own a male, it is common for the female beardies to lay infertile eggs that will not hatch.
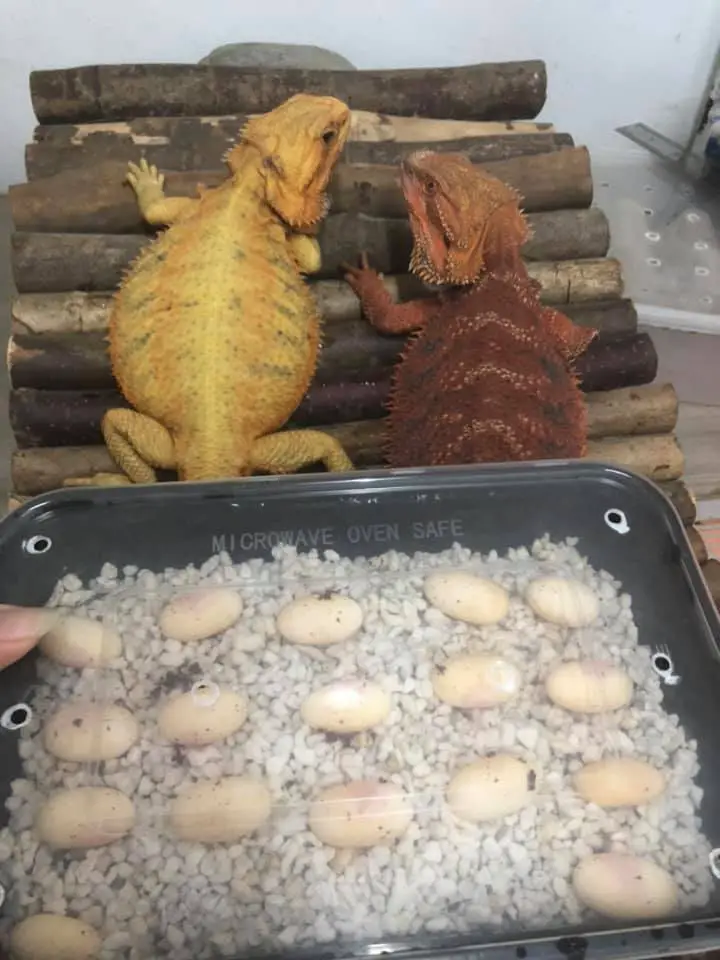
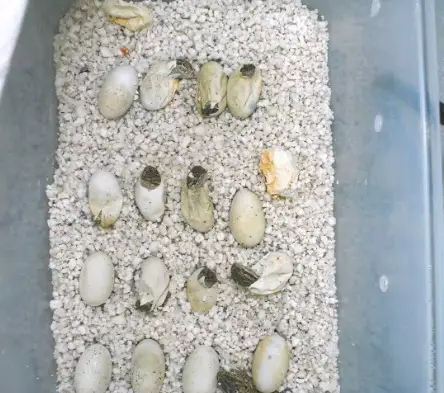
Bearded dragons lay their eggs in clutches; a single clutch contains around 20 eggs. After successful mating, female beardies typically lay anywhere from 1-3 clutches per pregnancy.
Though it is still possible to find a dragon laying up to six clutches, however, if it happens, you should be prepared. It is good to be prepared.
After your beardie lays the eggs, you will want to check if there are babies inside. It will be a waste of time and resources to incubate infertile eggs that will never give you hatchlings. Therefore, it is necessary to check for fertility.
Our Latest Video
Let’s continue reading
A Female Bearded Dragon Laying Eggs
Female dragons attain their maturity when they are around eight months to two years old. It is recommended not to mate your beardie anywhere below 18 months. Breeding her at this early age is like causing stress and might result in slow growth and other health issues.
Mating the dragon anywhere from 18 months to two years is healthy; the systems are fully mature and can safely carry the eggs. After mating, expect to receive the eggs from your beardie after about 3-5 weeks.
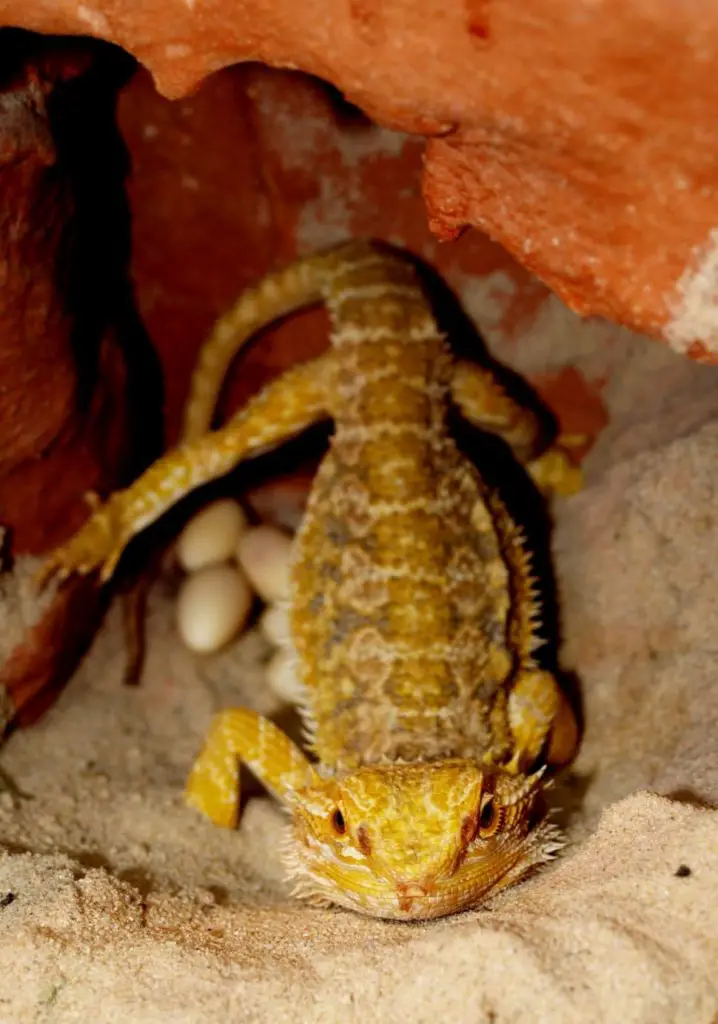
She will be carrying the eggs until they are fully developed. When it gets close to the time for a female to lay, you will notice that they tend to be inactive, often sleep under a heat lamp, and refuse to eat.
You will also note that the belly enlarges, and the eggs are visible from outside through oval protrusions. When she starts digging, it is about time to lay. You can provide a nesting box, or let them lay in the substrate if it is deep enough. which should be around 10 inches.
New to bearded dragon? Check out the bearded dragon care sheet now! We had listed out all the things you need to know about bearded dragons as pets. Check it now!
It takes about 30 minutes for the female to lay a complete clutch (around 20 eggs). She will then be ready to start the next clutch after two weeks.
Always provide more food and additional calcium to your gravid female. This is necessary until she completes her laying cycle.
Candling Bearded Dragon Eggs
How would you feel when you incubate your pet’s eggs, and after several trials, they fail to hatch or if only a few of the eggs hatched? It is disappointing, and some people will not want to do it again.
No one will want to end up with an abundance of unhatched eggs. The good thing is that it is something that you can freely control through candling. Candling is an easy and safe way to check the embryo’s current status.
Candling works by illuminating the egg’s interior and reveals what is inside the shell. Through candling, you get to identify the eggs that have their embryo developing and reduce the chance of incubating infertile eggs.
It also helps you to identify non-viable ones and discard them early, hence reduce the chances of caring for rotten eggs. The process can also tell if a fertile egg stops developing.
For successful results during candling, it is good to wait until day seven after the eggs have been laid. An egg that is below seven days has not developed much; therefore, it will be difficult to differentiate between bad and healthy eggs.
Candling Process
Check below to see the correct procedure of candling your bearded dragon eggs.
- Gather all the necessary tools. You don’t need to have fancy or specific types of equipment to perform egg candling. It was initially done with the candle’s flame, hence its name.
You will need bright light, smaller than the diameter of the egg, such as a bright light torch, and the eggs. Obtain the eggs together with the nesting box.
- Take the eggs into a dark room. It will allow you to see the inside of the egg clearly during the candling process.
- Take the egg carefully from the nesting box and hold the bright light behind it to help you see what is inside. If the egg is fertile, you will see a network of blood vessels, and it appears red.
If the egg is not fertile, it will give a yellow glow, and there are no visible veins. Also, you will also identify the eggs with tiny cracks on the shell that are invisible to the naked eyes.
- Return the egg in the same position it was before you picked it. Rotating it can lead to spoilage.
- Follow the same steps with all the eggs.
- Leave the eggs alone in their hatching position until day 14; then, you can check those eggs in which you doubted them.
Keep in mind that: cracked eggs are more prone to harmful bacteria entering and affecting embryo development. However, if you get an egg with a crack, don’t be in a hurry to throw it away, you might be discarding healthy eggs.
Mark them and be sure to check on their progress later.
If you notice that there are no apparent signs of development in the questionable eggs on day 14, this is the right time to get rid of them.
How to Hatch Bearded Dragon Eggs Without Incubator
After confirming that the eggs have babies, it’s time to incubate them. Two methods are ideal for hatching the eggs, that is, taking the eggs to an incubator or choosing to care for them in the soil without the incubator.
Whichever the case, the eggs will hatch successfully. In our case, we are focusing on hatching bearded dragon eggs without an incubator. I like this method because it is cheap and affordable for all people, and you have better control over everything.

You may choose to bury the eggs in the same position they were laid or set up a DIY incubation system by buying a plastic box.
Natural Soil
Hatching bearded dragon eggs in the soil is a simple and straightforward process. When your beardie lays its eggs in the substrate, the first and essential thing to do is clean the bedding; it helps to reduce bacteria and molds.
It is also the best option to remove the female beardie from the position. Bearded dragons don’t look after their eggs; instead, they tend to eat the hatchlings after they are hatched.
Since you have full control over all things, you will want to get an overhead lamp or under-tank heater to keep the temperatures high; anywhere between 80-85℉. Maintain this temperature range throughout the incubation period.
Use a hygrometer to ensure that the humidity is always at the desirable level. The ideal humidity for incubated eggs should be 75%. To obtain this level in the tank, spray the soil down frequently but be careful not to spray the eggs directly. It can result in mold growth on the shell and affect hatching.
Keep an eye on the eggs for mold, and you can turn them as little as possible. Then, wait for them to hatch, they can take around 55-90 days or even as early as 40 days.
Using a DIY Set Up Incubation System
This is an effective method when you don’t have an incubator. You just need to buy a plastic box or build your incubator. I will show you how to make a homemade incubator.
The next thing after you have the box with you is to place some wet vermiculite on the base of the box and distribute it evenly. Introduce some sand in the container and indent the eggs on the substrate to prevent them from rolling over.
You may also need to buy a heat mat because the room temperature may be unfavorable for the eggs to hatch sometimes.
New to bearded dragon? Check out the bearded dragon care sheet now! We had listed out all the things you need to know about bearded dragons as pets. Check it now!
How to Set Up a DIY Incubation System

(Source: TheStalion11 YouTube)
Sometimes it can be more costly to afford a commercial reptile incubator, especially when you have eggs from different species of reptiles, which may require more than one incubator.
Things tend to be cheaper if you can build your incubation system. You can construct an incubator of any size, whether small or large, depending on your preference.
DIY incubation systems can be used to incubate eggs from different reptiles; you just need to control the temperature and humidity as needed.
Step by Step Procedure on How to Build Your Incubator
To come up with a DIY incubator that is functional, you don’t need much knowledge, to understand how a thermostat, thermometer, and hygrometer works. It is a simple process, and anyone can do it.
Follow the procedure below to make your homemade incubator.
- The first step is to plan the type and size of the incubator that you want, depending on the number of eggs available to you.
- Collect all the tools and materials required for the construction of the incubator. Here is what you will need; thermostat, heating elements (heat cable or heat tape), accurate thermometer and hygrometer, drill bit, insulated container.
- Make sure that the container you are using (it can be a Styrofoam box, insulated food or drinker cooler, freezer, DIY Styro incubation container) is adequately sealed and insulated. It helps to prevent airflow and maintain a consistent temperature within the incubator.
- Use a drill bit to create a hole that is about 0.25 inch at the base of the container to allow for the heating elements to be plugged in. The egg incubation container should be placed above the heating element and never in direct contact with the heat source.
- After fixing the heating elements, the next thing is to add the thermometer. The thermometer probe should be placed near the place where the eggs will be incubated. You may require two thermometers if the container is bigger, to record the temperatures at the bottom and the top of the incubator.
- Add a thermostat probe into the incubator. Place it closer to where the egg container will be located during incubation, at the opposite side from where you fixed the thermometer. It is the most significant area where you need to check the temperature.
- Put the elevated shelf inside the incubator to allow sufficient space for the circulation of air in every side of the container holding the eggs. Make small holes in the egg container for little flow of air and avoid condensation. Place the container in the incubation box.
- You can provide a transparent lid to help you monitor the eggs without opening the incubator.
- Connect the heating element to the thermostat outlet, and plug the thermostat plug into the electrical wall socket and turn it on. Set the temperature with the thermostat and give enough time, about two hours, and then check the temperature readings on the thermometer.
Adjust the temperature using the thermostat until you reach the required level. This should go for about two days before introducing the eggs to make sure that the temperatures are correct.
- The remaining task is to add humidity to the incubation box. You can have vermiculite at the base of the incubation box, add a little water, and check on the changes in humidity. It will help increase the moisture to correct levels.
Watch this video on how to make a homemade incubator.
Bearded Dragon Eggs Hatching
(Source: MattD YouTube)
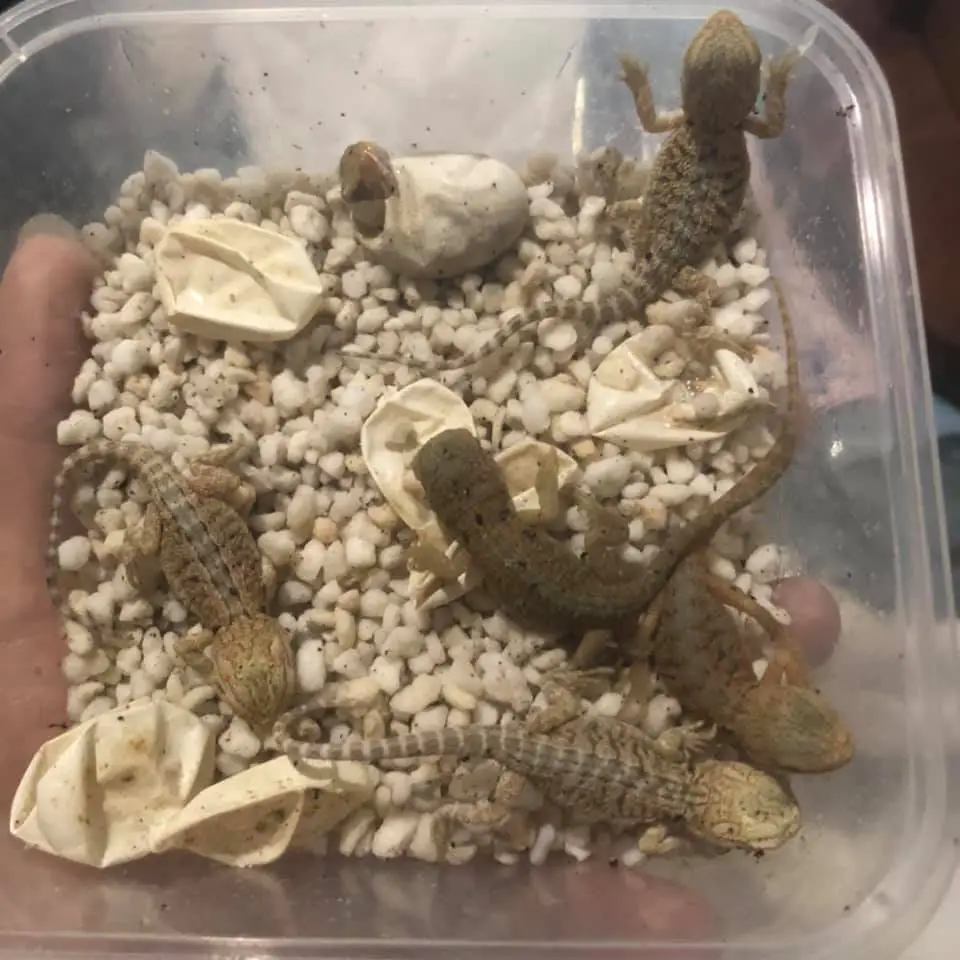
When the incubation period is coming to an end, a day before hatching begins, you will notice that the eggs are collapsing, and there will also be some moisture on the eggs. It is a good sign and alerts you that you are about to welcome new beardies.
The hatchlings slice the shell with their egg tooth for them to emerge; the egg tooth disappears shortly after hatching. Baby dragons emerge nose-first from their eggs.
In some situations, you will notice that the baby emerges with a yolk sac. Never attempt to remove it, it will be absorbed away or fall off.
Also, note that when the hatchling is unable to come out of the egg, don’t rush to assist it out. Some beardies will even take around 20-30 hours before they fully emerge from the shell. A healthy beardie will always find its way out.
Protip: maintain the hatchlings in the incubation box for a day to adjust to the environment, and encourage the others to wake up.
Hatching intervals between the beardies can vary; some will even hatch on day three after the first batch.
Provide a similar temperature to the enclosure as it is in the incubation box for the babies to thrive well.
Wrapping Up
I hope the article has been helpful, and you can now freely hatch your beardie’s eggs at home using the cheapest DIY incubator.
Hatching bearded dragon eggs without an incubator still provides a reasonable hatching rate, you just need to ensure that the temperatures and humidity are correct. It is an easy process and saves a lot of your money.
Our latest video